In the last article, we saw how to setup .Net Core Web API 3.1 project with Entity Framework. If you haven’t seen it yet, I invite you to read it through this links:
- .NET Core 3.1 WEB API – Entity Framework Core 3.1.7 (part 1)
- .NET Core 3.1 WEB API – Entity Framework Core 3.1.7 (part 2)
In this new tutorial, we’ll see how we can secure our Web Api with authentication Tokens.
What is the Token
An authentication token is an object encapsulating the security identity http request sender. It is generated when user make login at the first time and will be sanded every time the connected user send a request to the web API in the header of http request.
Why we use it?
In fact, we use it to avoid sending in every single request, the login and password of the user. That’s why we encapsulate this information in token.
You can see the video step by step on my YouTube channel.
Adding JWT Code
First of all, we need to install the NuGet package “System.IdentityModel.Tokens.Jwt” on Web API project.
After that, the UsersController, let’s add the JWT token code. So your Login action will look like:
 public IActionResult Login([FromBody] LoginDto loginDto)
{
      UserModel userModel = usersManager.Login(loginDto);
      if (userModel == null)
      {
           return BadRequest("Bad login or password.");
      }
      // JWT Tokens
      var now = DateTime.UtcNow;
      var tokenHandler = new JwtSecurityTokenHandler();
      var secretKey = Encoding.ASCII.GetBytes(appSettings.SecretKey);
      var tokenDiscriptor = new SecurityTokenDescriptor
      {
           Subject = new ClaimsIdentity(new Claim[] {
              new Claim(ClaimTypes.Email, userModel.Email)
            }),
            Expires = now.AddMinutes(4),
            SigningCredentials = new SigningCredentials(new SymmetricSecurityKey(secretKey), SecurityAlgorithms.HmacSha256Signature)
         };

       var token = tokenHandler.CreateToken(tokenDiscriptor);
       userModel.Represents the cryptographic key and security algorithms that are used to generate a digital signature.= tokenHandler.WriteToken(token);
       userModel.TokenExpires = now.AddMinutes(4);

       return Ok(userModel);
}
Add instantiate a new token Handler and get the secret key from the settings file. Once you’ve done all that, you can add a token descriptor in which we define:
- Subject: it represents the user claims identity (it can be email, role, group … ).
- Expires: it represents the validity period of the token.
- SigningCredentials: Represents the cryptographic key and security algorithms that are used to generate a digital signature.
In UserModel, don’t forget to add Token and TokenExpires properties.
Add JWT configuration
In startup file, we need to configure the JWT mechanism and define some rules like validating the issuer, calculation of expiration time, validating the token by the secret key…
So your code will look like this:
 public void ConfigureServices(IServiceCollection services)
        {
            var appSettingsSection = Configuration.GetSection("AppSettings");
            var appSettings = appSettingsSection.Get<AppSettings>();

            // Configure JWT authentication

            services.AddAuthentication(x =>
            {
                x.DefaultAuthenticateScheme = JwtBearerDefaults.AuthenticationScheme;
                x.DefaultChallengeScheme = JwtBearerDefaults.AuthenticationScheme;
            }).AddJwtBearer(x =>
            {
                x.RequireHttpsMetadata = false;
                x.SaveToken = true;
                x.TokenValidationParameters = new TokenValidationParameters
                {
                    ValidateIssuerSigningKey = true,
                    IssuerSigningKey = new SymmetricSecurityKey(Encoding.ASCII.GetBytes(appSettings.SecretKey)),
                    ValidateIssuer = false,
                    ValidateAudience = false,
                    ValidateLifetime = true,
                    ClockSkew = TimeSpan.Zero
                };
            });


            services.AddControllers();
            services.AddDbContext<RefreshTokenContext>(option =>
           {
               option.UseSqlServer(Configuration.GetConnectionString("RefreshTokenDb"));
           });
            services.AddScoped<IUnitOfWork, UnitOfWork>();
            services.AddScoped<IUsersRepository, UsersRepository>();
            services.AddScoped<IRefreshTokensRepository, RefreshTokensRepository>();

            services.AddScoped<IUsersManager, UsersManager>();
            services.AddScoped<IRefreshTokensManager, RefreshTokensManager>();
            services.Configure<AppSettings>(appSettingsSection);
        }
Don’t forget to add UseAuthentication, and UseAuthorization methods in Configure Method in Startup file and [Authorize] attribute in UsersController . Unless, you ‘ll never be able to use token.
    [Route("api/[controller]")]
    [ApiController]
    [Authorize]
    public class UsersController : ControllerBase
{
    //....
}
PostMan
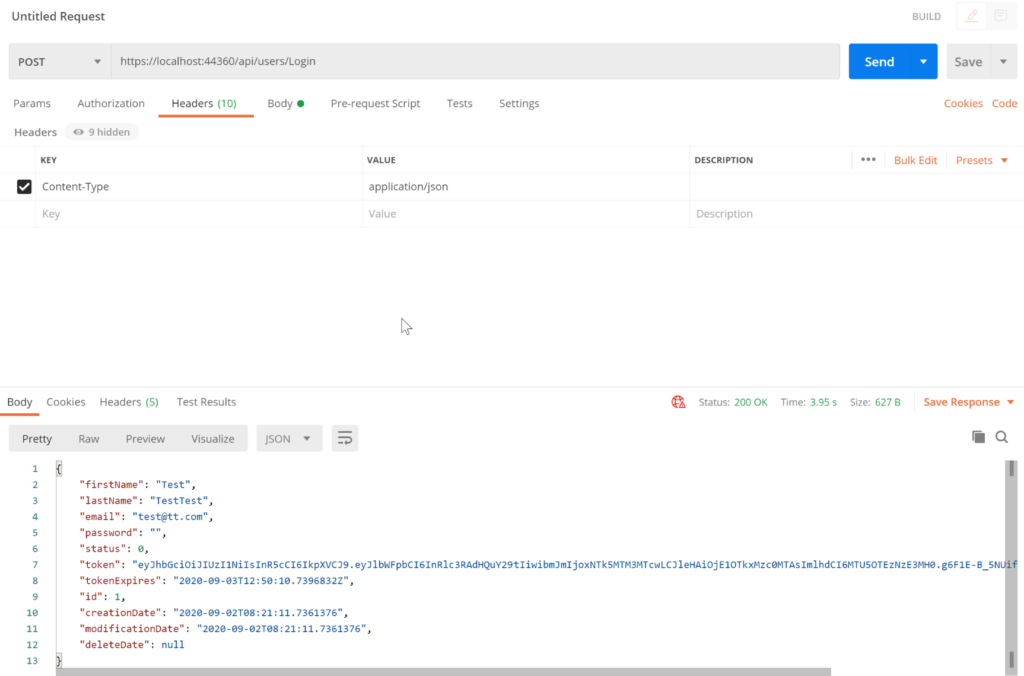
Now, go to postman and run the post request to Login:

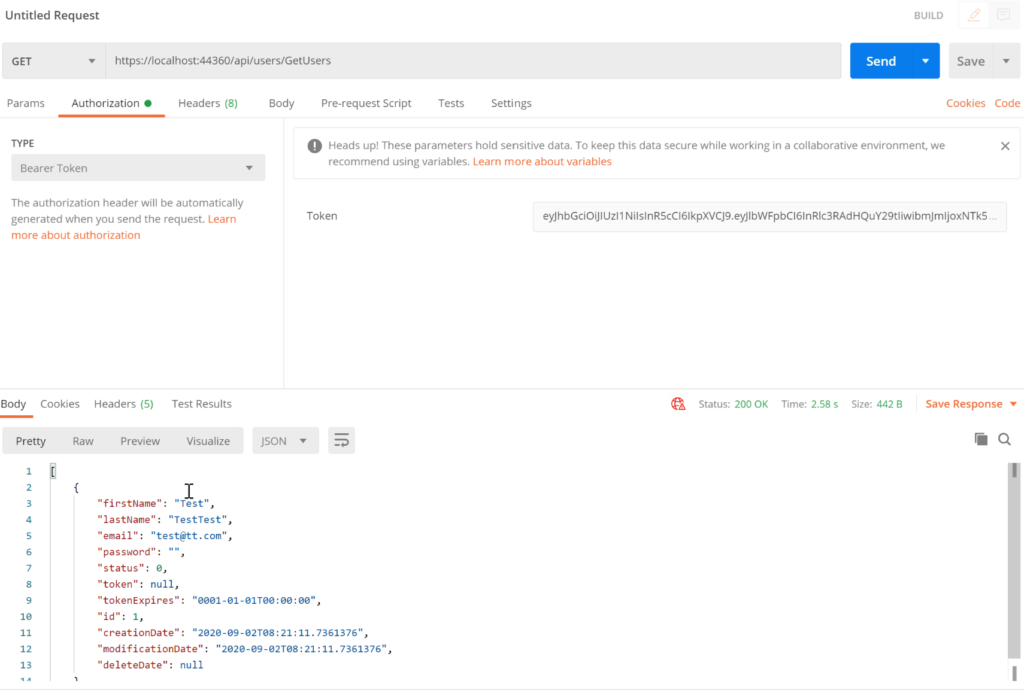
Finally, when you run GetsAllUsers, by default you’ll get 401 unauthorize error. In fact, you need to add the Token, in order to access this action in Web API. Good Job, your Web API now is secured.

Follow Me For Updates
Subscribe to my YouTube channel or follow me on Twitter or GitHub to be notified when I post new content.

Thanks for sharing your thoughts. I truly appreciate your efforts and I will be waiting for your next post thank you once again.
Wonderful post! We will be linking to this particularly great article on our site. Keep up the great writing.
For the reason that the admin of this web site is working, no uncertainty very quickly it will be famous, due to its quality contents. Norrie Cordie Lapotin
Great delivery. Sound arguments. Keep up the amazing effort.
Hi to all, the contents existing at this web site are truly remarkable for people experience, well, keep up the nice work fellows.
You completed some nice points there. I did a search on the issue and found nearly all people will consent with your blog. Winonah Haleigh
I have been browsing on-line greater than 3 hours nowadays, but I by no means discovered any interesting article like yours.
Looking forward to reading more. Great blog post. Really thank you! Want more.
Great job you have done. It will be very helpful for those who want to get the approval of blog comments. Thanks for sharing such a valuable post.
I usually dont commonly post on many another Blogs, however Thank you very much keep up the amazing work. Ok regrettably its time to get to school.
Useful info. Lucky me I found your website unintentionally, and I’m shocked why this accident didn’t took place earlier!
I bookmarked it.