In this part of Angular tutorial, we’re going to setup angular material of our Angular application.
Install prerequisites
First of all, we need to install angular CLI and NodeJS. You can have more details on angular.io and nodejs.org .
After installing NodeJS switch your environment, you have to execute this command to install angular CLI:
npm install -g @angular/cliNow, let’s create new project called “angular-material-tuto” by running this command:
ng new angular-material-tutoMaterial setup
After creating the projet, we have to install angular material by running this command:
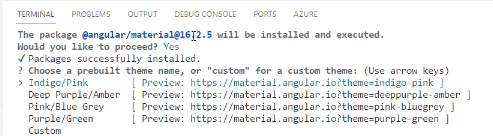
ng add @angular/material
Choose “Y” to proceed and after that choose one theme between 4. By default we have Indigo/Pink but it’s up to you any other theme.
Once you have chosen a theme, you can’t only define typography but also include and enable animations module

In “angular.json” file, ensure that you have the chosen theme css path. In our case it should be “@angular/material/prebuilt-themes/indigo-pink.css”. The first “styles” is under “build” property and the second one is under “test” property.
"styles": [
    "@angular/material/prebuilt-themes/indigo-pink.css",
    "src/styles.css"
],
Login component
This part of tutorial, we will make just a test to ensure that material framework works correctly. For that, we need to create a new component caller login under “src/app/views” by running:
ng c c login
In login.component.html file, put this code :
<mat-card>
  <mat-card-content>
   Simple card.
  </mat-card-content>
</mat-card>
In login.component.ts file, we must import MatCardModule :
import { Component} from '@angular/core';
import {MatCardModule} from '@angular/material/card';
@Component({
  selector: 'app-login',
  templateUrl: './login.component.html',
  styleUrls: ['./login.component.css'],
  standalone:true,
  imports:[MatCardModule]
})
export class LoginComponent{
}
Lastly, in “app-routing.module.ts” file, add new route in order to access the login page created previously:
import { NgModule } from '@angular/core';
import { RouterModule, Routes } from '@angular/router';
import { LoginComponent } from './views/login/login.component';

const routes: Routes = [{ path: 'login', component: LoginComponent }];

@NgModule({
  imports: [RouterModule.forRoot(routes)],
  exports: [RouterModule]
})
export class AppRoutingModule { }
Finally, let’s run the application and see the result:
ng serve -oSo after running the application you wil see a simple card with shadow effect. So simple!

Next part will be how to use material framework to make a real login form.
Follow Me For Updates
Subscribe to my YouTube channel or follow me on Twitter or GitHub to be notified when I post new content.