In this post we’ll go through an example of how to use CollectionView component with SwipeView.
CollectionView is a view for presenting lists of data using different layout specifications. It aims to provide a more flexible, and performant alternative to ListView.
You can get the code source on GitHub.
Differences between CollectionView and ListView
While the CollectionView and ListView APIs are similar, there are some notable differences:
- CollectionView has a flexible layout model, which allows data to be presented vertically or horizontally, in a list or a grid.
- CollectionView has no concept of cells. Instead, a data template is used to define the appearance of each item of data in the list.
- CollectionView automatically uses the virtualization provided by the underlying native controls.
- CollectionView reduces the API surface of ListView. Many properties and events from ListView are not present in CollectionView.
- It will throw an exception if its ItemsSource is updated off the UI thread.
CollectionView DataBinding
After creating a new Xamarin Forms – Prism project, let’s begin by adding new UserModel. In fact, we ‘ll user a free Web API to provide users data. You can take a look at this link. So your UserModel will look like this:
namespace CollectionView.Models
{
    public class UserModel
    {
        public long ID { get; set; }
        public string Name { get; set; }
        public string UserName { get; set; }
        public string Email { get; set; }
        public string Phone { get; set; }
        public string WebSite { get; set; }

    }
}
After that, we have to add new service called UsersService under Services folder. In fact this service will consume the Web API data and returns the list of available users.
Actually, we are using HttpClient to make GetAsync Http request. The method will be async because calling WEB API is an asynchronous call, which means that we don’t block the UI thread while waiting the http request response.
When we got the response we show it in the CollectionVeiw.
using CollectionView.Models;
using Newtonsoft.Json;
using System;
using System.Collections.Generic;
using System.Net.Http;
using System.Threading.Tasks;

namespace CollectionView.Services
{
    public class UsersService : IUsersService
    {
        private string apiUrl = "https://jsonplaceholder.typicode.com/";
        public async Task<IEnumerable<UserModel>> GetUsers()
        {
            using (HttpClient client = new HttpClient {BaseAddress = new Uri(apiUrl) })
            {
                var response = await client.GetAsync("users");

                if (!response.IsSuccessStatusCode)
                {
                    // TODO Log the exception
                    Console.WriteLine(response.StatusCode);
                    return default;
                }
                else
                {
                    var result = await response.Content.ReadAsStringAsync();
                    return JsonConvert.DeserializeObject<IEnumerable<UserModel>>(result);
                }
            }
        }
    }
}
In the MainPageViewModel, create a new property called Uers type of IEnumrable<UserModel> and initialize it using the usersService dependency.
Your MainPageViewModel seems like this code:
using CollectionView.Models;
using CollectionView.Services;
using Prism.Navigation;
using System.Collections.Generic;

namespace CollectionView.ViewModels
{
    public class MainPageViewModel : ViewModelBase
    {
        private readonly IUsersService usersService;


        private IEnumerable<UserModel> users;

        public IEnumerable<UserModel> Users
        {
            get => users;
            set => SetProperty(ref users, value);
        }


        public MainPageViewModel(INavigationService navigationService, IUsersService usersService)
            : base(navigationService)
        {
            Title = "Users List";
            this.usersService = usersService;
        }

        public override async void OnNavigatedTo(INavigationParameters parameters)
        {
            base.OnNavigatedTo(parameters);

            Users = await usersService.GetUsers();
        }
    }
}
In the other side, add the ClollectionView tag in the Xaml code and bind it to Users property created previously. Also, we can add a Header to our CollectionView in which, we make the same structure of grid in the ItemsSource template. It’s more significant to specify the data type or nature to the end user.
So you will get something like this code:
<?xml version="1.0" encoding="utf-8" ?>
<ContentPage xmlns="http://xamarin.com/schemas/2014/forms"
             xmlns:x="http://schemas.microsoft.com/winfx/2009/xaml"
             x:Class="CollectionView.Views.MainPage"
             Title="{Binding Title}">

    <StackLayout HorizontalOptions="CenterAndExpand"

                 VerticalOptions="CenterAndExpand">
        <CollectionView  ItemsSource="{Binding Users}">
            <CollectionView.ItemTemplate>
                <DataTemplate>
                    <Grid HeightRequest="60"
                          VerticalOptions="CenterAndExpand">
                        <Grid.ColumnDefinitions>
                            <ColumnDefinition Width="*"/>
                            <ColumnDefinition Width="*"/>
                            <ColumnDefinition Width="2*"/>
                        </Grid.ColumnDefinitions>
                        <Grid.RowDefinitions>
                            <RowDefinition Height="*"/>
                            <RowDefinition Height="1"/>
                        </Grid.RowDefinitions>

                        <Label Text="{Binding Name}"
                               Margin="10,0"
                               VerticalTextAlignment="Center"
                               FontAttributes="Bold"></Label>

                        <Label Text="{Binding UserName}"
                               Grid.Column="1"
                               VerticalTextAlignment="Center"></Label>

                        <Label Text="{Binding Email}"
                               Grid.Column="2"
                               VerticalTextAlignment="Center"></Label>
                        <BoxView Grid.Row="1"
                                 HeightRequest="1"
                                 Grid.ColumnSpan="3"
                                 BackgroundColor="Black"/>
                    </Grid>
                </DataTemplate>
            </CollectionView.ItemTemplate>
            <CollectionView.Header>
                    <Grid BackgroundColor="Black"
                          HeightRequest="40">
                        <Grid.ColumnDefinitions>
                            <ColumnDefinition Width="*"/>
                            <ColumnDefinition Width="*"/>
                            <ColumnDefinition Width="2*"/>
                        </Grid.ColumnDefinitions>

                        <Label Text="Name"
                               TextColor="White"
                               VerticalOptions="Center"
                               HorizontalOptions="Center"/>

                        <Label Grid.Column="1"
                               TextColor="White"
                               Text="UserName"
                               VerticalOptions="Center"
                               HorizontalOptions="Center"/>

                        <Label Grid.Column="2"
                               TextColor="White"
                               Text="Email"
                               VerticalOptions="Center"
                               HorizontalOptions="Center"/>

                    </Grid>
            </CollectionView.Header>
        </CollectionView>
    </StackLayout>

</ContentPage>
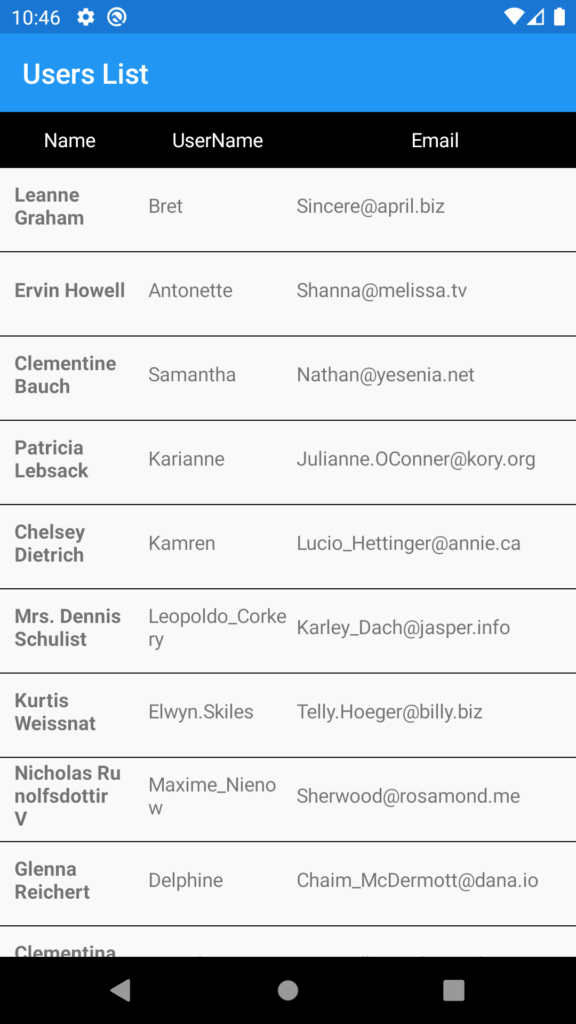
Now, deploy the application on your emulator or device, and you will see the list of you users:

CollectionView Interactivities
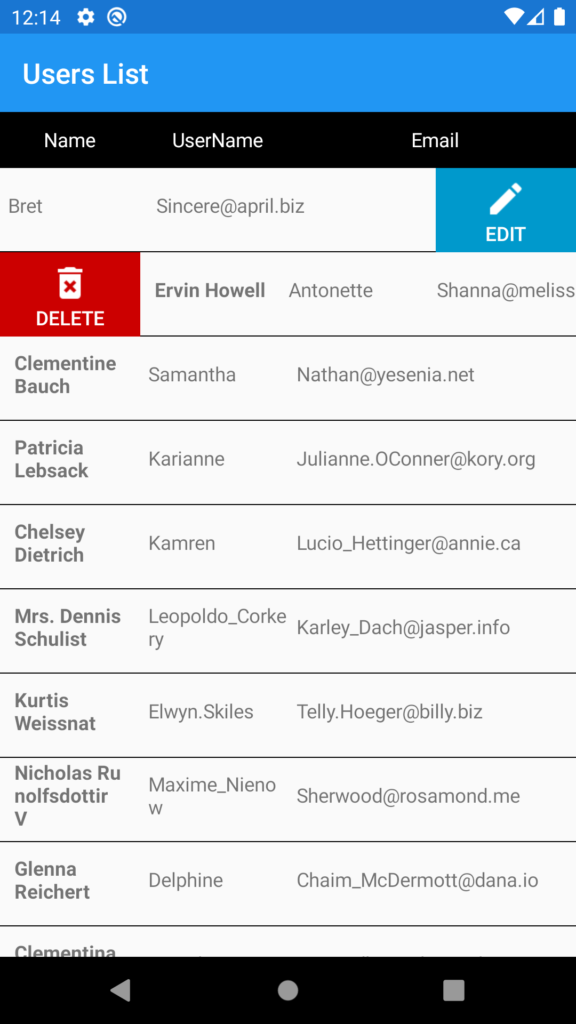
Eventually, you are wondering how to do interactions on this CollectionView like the Gmail or outlook to do a delete or an edit action. In fact, it’s very simple to do it. We’ll which we called SwipeView.
First of all, let’s go to Xaml code and add SwipeView to the DataTemplate, specify SwipeView.RightItems and SwipeView.LeftItems. Eventually, it’s recommended to define a maximum of 3 items.
In our case, we make Delete action when swiping left, and Edit action when swiping right.
Finally, don’t forget to add delete.png and edit.png images in the Android project under drawable folder
<SwipeView.RightItems>
    <SwipeItems>
       <SwipeItem Text="Edit"
                  Command="{Binding Path=BindingContext.EditCommand, Source={x:Reference Name=UsersPage}}" CommandParameter="{Binding .}"
                  IconImageSource="edit.png"
                  BackgroundColor="#09C" />
      </SwipeItems>
</SwipeView.RightItems>
<SwipeView.LeftItems>
     <SwipeItems>
         <SwipeItem Text="Delete"
                    Command="{Binding Path=BindingContext.DeleteCommand, Source={x:Reference Name=UsersPage}}" CommandParameter="{Binding .}"
                    IconImageSource="delete.png"
                    BackgroundColor="#CC0000" />
         </SwipeItems>
 </SwipeView.LeftItems>
In MainPageViewModel, add EditCommand and DeleteCommand properties.
using CollectionView.Models;
using CollectionView.Services;
using Prism.Commands;
using Prism.Navigation;
using System;
using System.Collections.Generic;
using System.Linq;
using System.Windows.Input;

namespace CollectionView.ViewModels
{
    public class MainPageViewModel : ViewModelBase
    {
        private readonly IUsersService usersService;


        private IEnumerable<UserModel> users;

        public IEnumerable<UserModel> Users
        {
            get => users;
            set => SetProperty(ref users, value);
        }

        public ICommand EditCommand { get; private set; }
        public ICommand DeleteCommand { get; private set; }


        public MainPageViewModel(INavigationService navigationService, IUsersService usersService)
            : base(navigationService)
        {
            Title = "Users List";
            this.usersService = usersService;

            EditCommand = new DelegateCommand<UserModel>(EditUser);
            DeleteCommand = new DelegateCommand<UserModel>(DeleteUser);
        }

        private async void DeleteUser(UserModel userModel)
        {
            await App.Current.MainPage.DisplayAlert("Alert", "This is a delete action!", "Ok");
        }

        private async  void EditUser(UserModel userModel)
        {
            await App.Current.MainPage.DisplayAlert("Alert", "This is an edit action!", "Ok");
        }

        public override void OnNavigatedTo(INavigationParameters parameters)
        {
            base.OnNavigatedTo(parameters);
            InitData();
        }

        private async void InitData()
        {
            Users = await usersService.GetUsers();
        }
    }
}
Finally, SwipeView is available in Xamarin.Forms 4.4. However, it’s currently experimental and can only be used by adding the following line of code to your AppDelegate class on iOS, to your MainActivity class on Android, or to your App class on UWP, before calling Forms.Init:
Forms.SetFlags("SwipeView_Experimental");

Follow Me For Updates
Subscribe to my YouTube channel or follow me on Twitter or GitHub to be notified when I post new content.
