In this new tutorial, we ‘ill explore together how to manipulate the component ListView.
You can get the code source on GitHub.
Data Binding
First of all, let’s create a new Xamarin Forms Prism template application called ListView. You can find more detail in the previous post.
After that, open the MainPage.xaml page and add new ListView Tag.
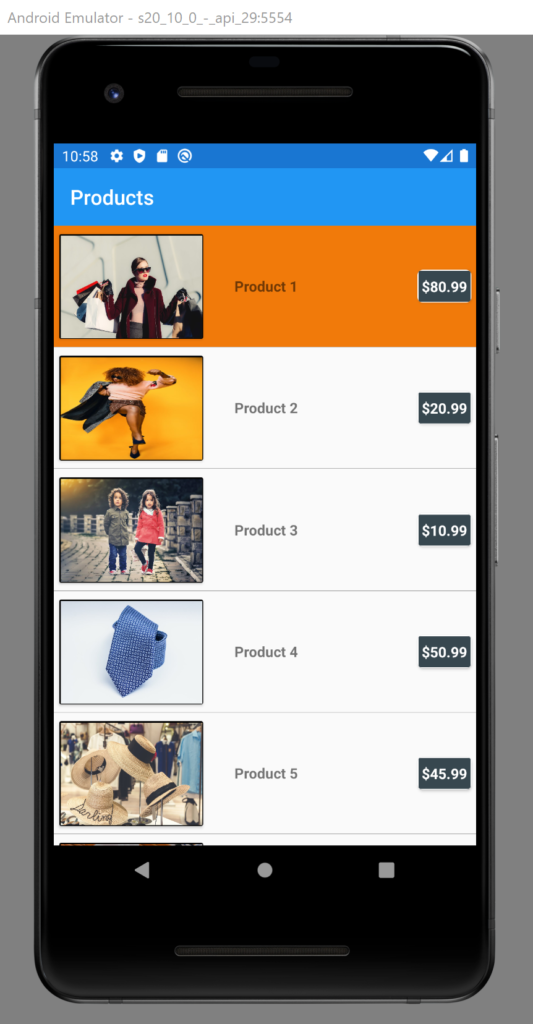
In this ListView, we’ll show the list of some products like E-Commerce applications. We need to show the image of product, name and price.
Porducts Service
Before creating the xaml code, we have to add new service called ProductsService, in which we add the method to get the list of products. That’s why, we add new folder called Services and after that define the ProductsService and its interface for the dependency injection.
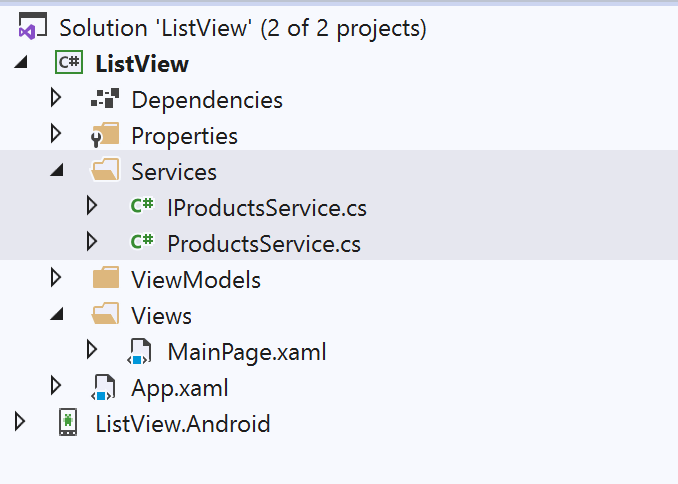
Now, let’s define the ProductModel entity, it contains the ID, Name, Price and Product Image.
namespace ListView.Models
{
    class ProductModel
    {
        public long ID { get; set; }

        public string Name { get; set; }

        public float Price { get; set; }

        public string ImagePath { get; set; }
    }
}
using ListView.Models;
using System.Collections.Generic;

namespace ListView.Services
{
    public interface IProductsService
    {
        IEnumerable<ProductModel> GetAll();
    }
}
using ListView.Models;
using System.Collections.Generic;

namespace ListView.Services
{
    public class ProductsService : IProductsService
    {
        public IEnumerable<ProductModel> GetAll()
        {
            return new List<ProductModel>
            {
                new ProductModel{ ID = 1, Name = "Product 1", Price = 80.99f, ImagePath = "https://www.pexels.com/photo/adult-beautiful-elegant-eyewear-291762/"},
                new ProductModel{ ID = 2, Name = "Product 2", Price = 20.99f, ImagePath = "https://www.pexels.com/photo/woman-in-peach-color-and-red-floral-sweatshirt-holding-gray-jacket-794062/"},
                new ProductModel{ ID = 3, Name = "Product 3", Price = 10.99f, ImagePath = "https://www.pexels.com/photo/people-girl-design-happy-35188/"},
                new ProductModel{ ID = 4, Name = "Product 4", Price = 50.99f, ImagePath = "https://www.pexels.com/photo/neck-tie-tie-mens-tie-fashion-45055/"},
                new ProductModel{ ID = 5, Name = "Product 5", Price = 45.99f, ImagePath = "https://www.pexels.com/photo/four-brown-straw-hats-display-1078973/"},
                new ProductModel{ ID = 6, Name = "Product 6", Price = 33.99f, ImagePath = "https://www.pexels.com/photo/chevron-sleeveless-dress-2994951/"},
                new ProductModel{ ID = 7, Name = "Product 7", Price = 38.99f, ImagePath = "https://www.pexels.com/photo/blur-clothes-clothing-collection-297367/"},
                new ProductModel{ ID = 8, Name = "Product 8", Price = 200.99f, ImagePath = "https://www.pexels.com/photo/woman-snowflakes-frozen-river-winter-clothing-54203/"},
                new ProductModel{ ID = 9, Name = "Product 9", Price = 80.99f, ImagePath = "https://www.pexels.com/photo/toddler-boy-wearing-red-and-black-winter-jacket-and-gray-ushanka-hat-standing-on-snow-covered-field-744790/"}
            };
        }
    }
}
Now, let’s move to xaml MainPage and add the following code:
<?xml version="1.0" encoding="utf-8" ?>
<ContentPage xmlns="http://xamarin.com/schemas/2014/forms"
             xmlns:x="http://schemas.microsoft.com/winfx/2009/xaml"
             x:Class="ListView.Views.MainPage"
             Title="Products ">

    <StackLayout HorizontalOptions="CenterAndExpand" VerticalOptions="CenterAndExpand">
        <ListView ItemsSource="{Binding Products}"
                  HasUnevenRows="True"
                  BackgroundColor="Transparent"
                  SeparatorColor="Gray"
                  >
            <ListView.ItemTemplate>
                <DataTemplate>
                    <ViewCell>
                        <Grid Margin="0,3" VerticalOptions="Center">
                            <Grid.ColumnDefinitions>
                                <ColumnDefinition Width="150"/>
                                <ColumnDefinition Width="3*"/>
                                <ColumnDefinition Width="*"/>
                            </Grid.ColumnDefinitions>

                            <Frame Margin="5"
                                   Padding="1"
                                   HasShadow="True"
                                   WidthRequest="100"
                                   BackgroundColor="Black"
                                   HeightRequest="100">
                                <Image Source="{Binding ImagePath}"
                                       Margin="0.2"
                                       Aspect="Fill"
                                       HeightRequest="100"
                                       WidthRequest="100"
                                       HorizontalOptions="FillAndExpand"
                                       VerticalOptions="FillAndExpand"/>
                            </Frame>
                            <StackLayout Orientation="Horizontal"
                                         Margin="20,0"
                                         VerticalOptions="Center"
                                         Grid.Column="1">
                                <StackLayout VerticalOptions="Center"
                                             HorizontalOptions="FillAndExpand"
                                             Spacing="1">
                                    <Label Text="{Binding Name}"
                                            FontAttributes="Bold"/>
                                </StackLayout>
                            </StackLayout>
                            <Frame Margin="5"
                                   Padding="1"
                                   VerticalOptions="Center"
                                   Grid.Column="2"
                                   CornerRadius="5"
                                   WidthRequest="40"
                                   HeightRequest="30"
                                   HasShadow="True">
                                <Label Text="{Binding Price, StringFormat='{0:C}'}"
                                       Margin="0"
                                       TextColor="#FFFFFF"
                                       FontAttributes="Bold"
                                       HorizontalTextAlignment="Center"
                                       VerticalTextAlignment="Center"
                                       HorizontalOptions="FillAndExpand"
                                       VerticalOptions="FillAndExpand"
                                       BackgroundColor="#37474F"/>
                            </Frame>
                        </Grid>
                    </ViewCell>
                </DataTemplate>
            </ListView.ItemTemplate>
        </ListView>
    </StackLayout>

</ContentPage>
In the MainPageViewModel, add new Property called Products. It represents the list of products to show. We initialize it in side private method called InitData when we navigate to the MainPage. Your MainPageViewModel will look like:
using ListView.Models;
using ListView.Services;
using Prism.Navigation;
using System.Collections.Generic;

namespace ListView.ViewModels
{
    public class MainPageViewModel : ViewModelBase
    {
        private IEnumerable<ProductModel> products;
        private readonly IProductsService productsService;

        public IEnumerable<ProductModel> Products
        {
            get => products;
            set => SetProperty(ref products, value);
        }
        public MainPageViewModel(INavigationService navigationService, IProductsService productsService)
            : base(navigationService)
        {
            this.productsService = productsService;
        }

        public override void OnNavigatedTo(INavigationParameters parameters)
        {
            base.OnNavigatedTo(parameters);
            InitData();
        }

        private void InitData()
        {
            Products = productsService.GetAll();
        }
    }
}
Don’t forget to declare the ProductsService dependency in app.xaml.cs
using Prism;
using Prism.Ioc;
using ListView.ViewModels;
using ListView.Views;
using Xamarin.Essentials.Interfaces;
using Xamarin.Essentials.Implementation;
using Xamarin.Forms;
using ListView.Services;
using Prism.Unity;

namespace ListView
{
    public partial class App: PrismApplication
    {
        public App(IPlatformInitializer initializer)
            : base(initializer)
        {
        }

        protected override async void OnInitialized()
        {
            InitializeComponent();

            await NavigationService.NavigateAsync("NavigationPage/MainPage");
        }

        protected override void RegisterTypes(IContainerRegistry containerRegistry)
        {
            containerRegistry.RegisterSingleton<IAppInfo, AppInfoImplementation>();

            containerRegistry.RegisterForNavigation<NavigationPage>();
            containerRegistry.RegisterForNavigation<MainPage, MainPageViewModel>();
            containerRegistry.Register<IProductsService, ProductsService>();
        }
    }
}
Grouped Items
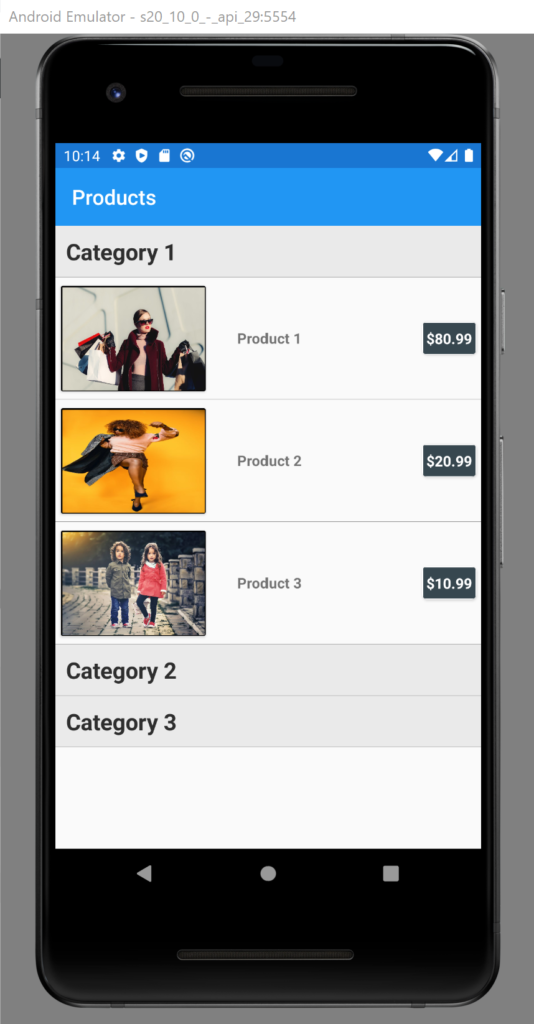
Items can be grouped by Categories for example. However, to do that, we need to create a specific View Model called ProductsVM.
In fact, This class extends the ObservableCollection<ProductModel> and implements INotifyPropertyChanged interface. It contains also, 3 major properties:
- The category name.
- Expanded.
- The products list.
using ListView.Models;
using System.Collections.ObjectModel;
using System.ComponentModel;

namespace ListView.ViewModels
{
    public class ProductsVM : ObservableCollection<ProductModel>, INotifyPropertyChanged
    {

        private string categoryName;
        public string CategoryName
        {
            get => categoryName;
            set
            {
                categoryName = value;
                OnPropertyChanged(new PropertyChangedEventArgs("CategoryName"));
            }
        }

        private bool expanded;
        public bool Expanded
        {
            get => expanded;
            set
            {
                expanded = value;
                ClearItems();

                if (!expanded)
                {
                    ClearItems();
                }
                else if (Products != null)
                {
                    foreach (var item in Products)
                    {
                        Add(item);
                    }
                }

                OnPropertyChanged(new PropertyChangedEventArgs("Expanded"));
            }
        }

        private ObservableCollection<ProductModel> products;

        public ObservableCollection<ProductModel> Products
        {
            get => products;
            set
            {
                products = value;
                OnPropertyChanged(new PropertyChangedEventArgs("Products"));
            }
        }
    }
}
Now, let’s create new property in MainPageViewModel called ProductsList type of IEumerable<ProductVM> and initialized by data from the ProductsService. Eventually, you have to create a new method in the service returns an enumerable of ProductVM . In real case, have to make a group by Category in you query.
  private IEnumerable<ProductsVM> productsList;

        public IEnumerable<ProductsVM> ProductsList
        {
            get => productsList;
            set
            {
                SetProperty(ref productsList, value);
                OnPropertyChanged(new PropertyChangedEventArgs("ProductsList"));

            }
        }

  private void InitData()
  {
      Products = productsService.GetAll();
      ProductsList = productsService.GetAllGrouppedByCategory();
  }
In MainPage.xaml, we have to make some changes in the Xaml code in order to bind the new ProductVM structure with the list view.
<?xml version="1.0" encoding="utf-8" ?>
<ContentPage xmlns="http://xamarin.com/schemas/2014/forms"
             xmlns:x="http://schemas.microsoft.com/winfx/2009/xaml"
             x:Class="ListView.Views.MainPage"
             Title="Products ">

    <StackLayout HorizontalOptions="CenterAndExpand" VerticalOptions="CenterAndExpand">
        <ListView ItemsSource="{Binding ProductsList}"
                  HasUnevenRows="True"
                  BackgroundColor="Transparent"
                  IsGroupingEnabled="True"
                  SelectionMode="Single"
                  SeparatorColor="Gray">
            <ListView.ItemTemplate>
                <DataTemplate>
                    <ViewCell>
                        <Grid Margin="0,3" VerticalOptions="Center">
                            <Grid.ColumnDefinitions>
                                <ColumnDefinition Width="150"/>
                                <ColumnDefinition Width="3*"/>
                                <ColumnDefinition Width="*"/>
                            </Grid.ColumnDefinitions>

                            <Frame Margin="5"
                                   Padding="1"
                                   HasShadow="True"
                                   WidthRequest="100"
                                   BackgroundColor="Black"
                                   HeightRequest="100">
                                <Image Source="{Binding ImagePath}"
                                       Margin="0.2"
                                       Aspect="Fill"
                                       HeightRequest="100"
                                       WidthRequest="100"
                                       HorizontalOptions="FillAndExpand"
                                       VerticalOptions="FillAndExpand"/>
                            </Frame>
                            <StackLayout Orientation="Horizontal"
                                         Margin="20,0"
                                         VerticalOptions="Center"
                                         Grid.Column="1">
                                <StackLayout VerticalOptions="Center"
                                             HorizontalOptions="FillAndExpand"
                                             Spacing="1">
                                    <Label Text="{Binding Name}"
                                            FontAttributes="Bold"/>
                                </StackLayout>
                            </StackLayout>
                            <Frame Margin="5"
                                   Padding="1"
                                   VerticalOptions="Center"
                                   Grid.Column="2"
                                   CornerRadius="5"
                                   WidthRequest="40"
                                   HeightRequest="30"
                                   HasShadow="True">
                                <Label Text="{Binding Price, StringFormat='{0:C}'}"
                                       Margin="0"
                                       TextColor="#FFFFFF"
                                       FontAttributes="Bold"
                                       HorizontalTextAlignment="Center"
                                       VerticalTextAlignment="Center"
                                       HorizontalOptions="FillAndExpand"
                                       VerticalOptions="FillAndExpand"
                                       BackgroundColor="#37474F"/>
                            </Frame>
                        </Grid>
                    </ViewCell>
                </DataTemplate>
            </ListView.ItemTemplate>
            <ListView.GroupHeaderTemplate>
                <DataTemplate>
                    <ViewCell>
                        <Grid BackgroundColor="#eaeaea">
                            <Grid.ColumnDefinitions>
                                <ColumnDefinition Width="*"/>
                                <ColumnDefinition Width="Auto"/>
                            </Grid.ColumnDefinitions>
                            <StackLayout HorizontalOptions="Start"
                                         Margin="10"
                                         VerticalOptions="Center">

                                <Label Text="{Binding CategoryName}"
                                       FontSize="22"
                                       FontAttributes="Bold"
                                       VerticalOptions="Center"
                                       HorizontalOptions="Start"
                                       TextColor="#2E2E2E"/>

                            </StackLayout>
                        </Grid>
                    </ViewCell>
                </DataTemplate>
            </ListView.GroupHeaderTemplate>
        </ListView>
    </StackLayout>

</ContentPage>
The result will be something like this image below:
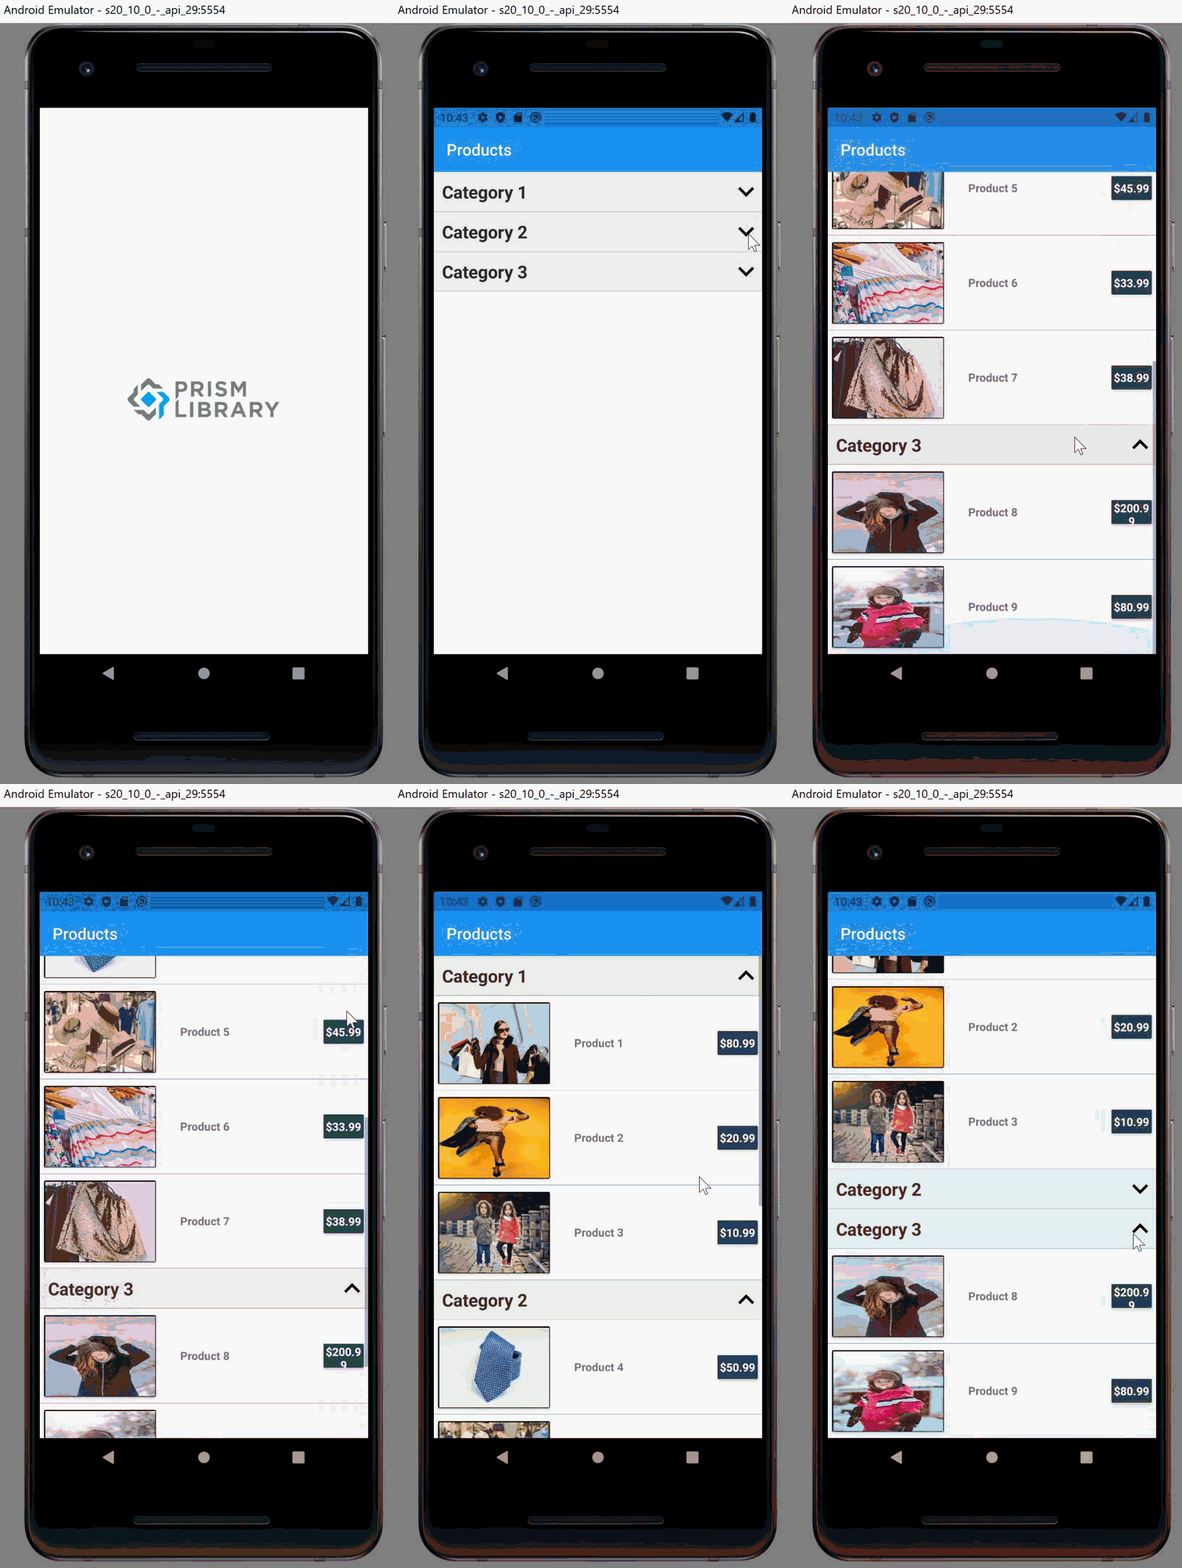
Let’s make things more interactive. We will add an image indicating whether the category is expanded or not and by clicking on the category we expand it. To do it, we have to add new command in the MainPageViewModel called HeaderClickCommand and bind it with the list view header.
  public ICommand HeaderClickCommand { get; private set; }

        public MainPageViewModel(INavigationService navigationService, IProductsService productsService)
            : base(navigationService)
{
     this.productsService = productsService;
    HeaderClickCommand = new Command<ProductsVM>((item) => ExecuteHeaderClickCommand(item));

}

private void ExecuteHeaderClickCommand(ProductsVM item)
{
     item.Expanded = !item.Expanded;
     OnPropertyChanged(new PropertyChangedEventArgs("ProductsList"));
}
When user click on header, we reverse the Expanded property value.
In the xaml side, add a name to the main page called x:Name=”MasterMage”. We’ll use it to make binding on HeaderClickCommand.
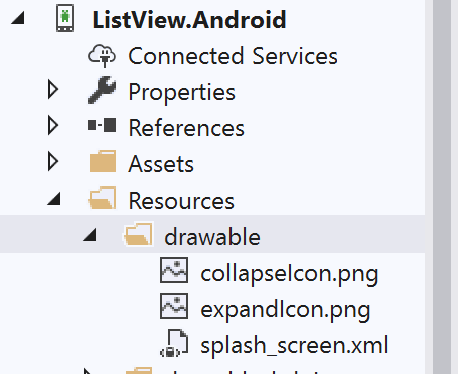
After that, just add the images to indicate if the category is expanded or not under Android project in drawable folder.
Don’t forget to add BoolToImageConverter under Converters folder and declare it in App.xaml page.
using System;
using System.Globalization;
using Xamarin.Forms;

namespace ListView.Converters
{
    public class BoolToImageConverter : IValueConverter
    {
        public object Convert(object value, Type targetType, object parameter, CultureInfo culture)
        {
            if ((bool)value)
            {
                return "collapseIcon.png";
            }
            else
            {
                return "expandIcon.png";
            }
        }

        public object ConvertBack(object value, Type targetType, object parameter, CultureInfo culture)
        {
            throw new NotImplementedException();
        }
    }
}
<?xml version="1.0" encoding="utf-8" ?>
<prism:PrismApplication xmlns="http://xamarin.com/schemas/2014/forms"
             xmlns:x="http://schemas.microsoft.com/winfx/2009/xaml"
             xmlns:prism="http://prismlibrary.com"
             xmlns:local="clr-namespace:ListView.Converters"
             x:Class="ListView.App">
  <Application.Resources>

    <!-- Application resource dictionary -->
        <ResourceDictionary>
            <local:BoolToImageConverter x:Key="BoolToImageConverter"/>
        </ResourceDictionary>
  </Application.Resources>
</prism:PrismApplication>
Finally, your xaml code will look like:
<?xml version="1.0" encoding="utf-8" ?>
<ContentPage xmlns="http://xamarin.com/schemas/2014/forms"
             xmlns:x="http://schemas.microsoft.com/winfx/2009/xaml"
             x:Class="ListView.Views.MainPage"
             Title="Products"
             x:Name="MasterMage">

    <StackLayout HorizontalOptions="CenterAndExpand" VerticalOptions="CenterAndExpand">
        <ListView ItemsSource="{Binding ProductsList}"
                  HasUnevenRows="True"
                  BackgroundColor="Transparent"
                  IsGroupingEnabled="True"
                  SelectionMode="Single"
                  SeparatorColor="Gray">
            <ListView.ItemTemplate>
                <DataTemplate>
                    <ViewCell>
                        <Grid Margin="0,3" VerticalOptions="Center">
                            <Grid.ColumnDefinitions>
                                <ColumnDefinition Width="150"/>
                                <ColumnDefinition Width="3*"/>
                                <ColumnDefinition Width="*"/>
                            </Grid.ColumnDefinitions>

                            <Frame Margin="5"
                                   Padding="1"
                                   HasShadow="True"
                                   WidthRequest="100"
                                   BackgroundColor="Black"
                                   HeightRequest="100">
                                <Image Source="{Binding ImagePath}"
                                       Margin="0.2"
                                       Aspect="Fill"
                                       HeightRequest="100"
                                       WidthRequest="100"
                                       HorizontalOptions="FillAndExpand"
                                       VerticalOptions="FillAndExpand"/>
                            </Frame>
                            <StackLayout Orientation="Horizontal"
                                         Margin="20,0"
                                         VerticalOptions="Center"
                                         Grid.Column="1">
                                <StackLayout VerticalOptions="Center"
                                             HorizontalOptions="FillAndExpand"
                                             Spacing="1">
                                    <Label Text="{Binding Name}"
                                            FontAttributes="Bold"/>
                                </StackLayout>
                            </StackLayout>
                            <Frame Margin="5"
                                   Padding="1"
                                   VerticalOptions="Center"
                                   Grid.Column="2"
                                   CornerRadius="5"
                                   WidthRequest="40"
                                   HeightRequest="30"
                                   HasShadow="True">
                                <Label Text="{Binding Price, StringFormat='{0:C}'}"
                                       Margin="0"
                                       TextColor="#FFFFFF"
                                       FontAttributes="Bold"
                                       HorizontalTextAlignment="Center"
                                       VerticalTextAlignment="Center"
                                       HorizontalOptions="FillAndExpand"
                                       VerticalOptions="FillAndExpand"
                                       BackgroundColor="#37474F"/>
                            </Frame>
                        </Grid>
                    </ViewCell>
                </DataTemplate>
            </ListView.ItemTemplate>
            <ListView.GroupHeaderTemplate>
                <DataTemplate>
                    <ViewCell>
                        <Grid BackgroundColor="#eaeaea">
                            <Grid.ColumnDefinitions>
                                <ColumnDefinition Width="*"/>
                                <ColumnDefinition Width="40"/>
                            </Grid.ColumnDefinitions>
                            <StackLayout HorizontalOptions="Start"
                                         Margin="10"
                                         VerticalOptions="Center">

                                <Label Text="{Binding CategoryName}"
                                       FontSize="22"
                                       FontAttributes="Bold"
                                       VerticalOptions="Center"
                                       HorizontalOptions="Start"
                                       TextColor="#2E2E2E"/>
                            </StackLayout>
                            <Image Grid.Column="1"
                                   Source="{Binding Expanded, Converter={StaticResource BoolToImageConverter}}" />
                            <Grid.GestureRecognizers>
                                <TapGestureRecognizer Command="{Binding  Source={x:Reference MasterMage}, Path=BindingContext.HeaderClickCommand}"  NumberOfTapsRequired="1"  CommandParameter="{Binding .}"/>
                            </Grid.GestureRecognizers>
                        </Grid>
                    </ViewCell>
                </DataTemplate>
            </ListView.GroupHeaderTemplate>
        </ListView>
    </StackLayout>

</ContentPage>
Follow Me For Updates
Subscribe to my YouTube channel or follow me on Twitter or GitHub to be notified when I post new content.