Pagination is an essential mechanism for managing a data grid with a large number of items. Generally, this type of component is chargeable and even the free versions are limited.
In this part of tutorial, we will learn together how to add a pagination component to bootstrap table using Ng-Bootstrap module.
You can watch my video on Youtube channel:
You can install Ng-Bootstrap by running this command:
npm install --save @ng-bootstrap/ng-bootstrapOnce installed you need to import our main module.
import {NgbModule} from '@ng-bootstrap/ng-bootstrap';

@NgModule({
  ...
  imports: [NgbModule, ...],
  ...
})
export class YourAppModule {
}
Since Angular 9 (and ng-bootstrap 6) you might have to add the additional @angular/localize polyfill to your CLI project. See more details in the official documentation.
Adding ngb-pagination component
Create a new component called tablePagination in which, you add bootstrap table to show users list for example. Eventually, you have to add users list property in the type script file type of array of UserModel.
<div class="m-5">
    <table class="table">
        <thead class="thead-light">
            <tr>
                <th scope="col">Random</th>
                <th scope="col">First Name</th>
                <th scope="col">Last Name</th>
                <th scope="col">Email</th>
            </tr>
        </thead>
        <tbody>
            <tr *ngFor="let item of usersList>
                <th scope="row">{{item.random}}</th>
                <td>{{item.firstName}}</td>
                <td>{{item.lastName}}</td>
                <td>{{item.email}}</td>
            </tr>
        </tbody>
    </table>
</div>
Now, we need to create a service that will return a fake users Model. Let’s begin by creating a Class under Models folder called UserModel by running this command:
ng g class Models/UserModel
export class UserModel {
    public firstName: string;
    public lastName: string;
    public email: string;
}
After that, create a new service by running this command:
ng g service Services/FakeModels
import { Injectable } from '@angular/core';

@Injectable({
  providedIn: 'root'
})
export class FakeModelsService {

  constructor() { }

  getUsers() {

    let list = [];

    for (let index = 0; index < 100; index++) {
      list.push({firstName : "Ariana", lastName :"Grande", email: "ariana.grande@xxxx.com", random: Math.random()});
    }
    return list;
  }
}
In TablePaginationComponent, call the FakeModelsService and initialize the UsersList property.
import { Component, OnInit } from '@angular/core';
import { UserModel } from 'src/app/Models/user-model';
import { FakeModelsService } from 'src/app/Services/fake-models.service';

@Component({
  selector: 'app-table-pagination',
  templateUrl: './table-pagination.component.html',
  styleUrls: ['./table-pagination.component.css']
})
export class TablePaginationComponent implements OnInit {
  public usersList: Array<UserModel> = [];
  constructor(private fakeService: FakeModelsService) { }

  ngOnInit(): void {
    this.usersList = this.fakeService.getUsers();
  }
}
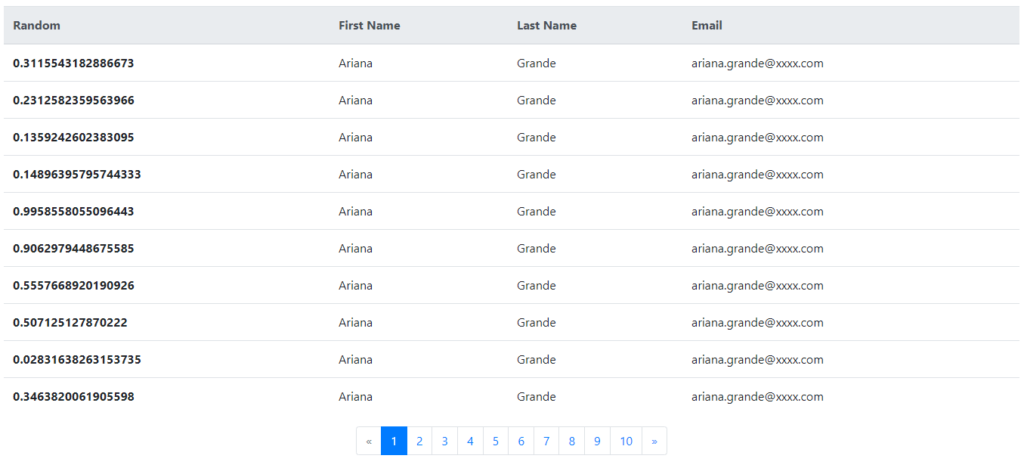
When you run the application, you will see normal table with 100 items without pagination. So, let’s add this famous pagination component.
In Ng-Bootstrap site web, search the pagination item in the left site under documentation section. This is the direct link .
In the html file, add ngb-pagination tag and slice method in the ngFor loop, so you code will be look like:
<div class="m-5">
    <table class="table">
        <thead class="thead-light">
            <tr>
                <th scope="col">Random</th>
                <th scope="col">First Name</th>
                <th scope="col">Last Name</th>
                <th scope="col">Email</th>
            </tr>
        </thead>
        <tbody>
            <tr *ngFor="let item of usersList | slice: (page-1) * pageSize : (page-1) * pageSize + pageSize">
                <th scope="row">{{item.random}}</th>
                <td>{{item.firstName}}</td>
                <td>{{item.lastName}}</td>
                <td>{{item.email}}</td>
            </tr>
        </tbody>
    </table>

    <ngb-pagination class="d-flex justify-content-center" [(page)]="page" [pageSize]="pageSize" [collectionSize]="usersList.length"></ngb-pagination>
</div>
Eventually, don’t forget to initialize the page property to 1 and pageSize to 10.
Let’s explain more:
– collectionSize – Number of elements/items in the collection. i.e. the total number of items the pagination should handle.
– pageSize – Number of elements/items per page.
– page – The current page.
To split the data collection yourself, use *ngFor associated with the slice pipe to extract (or slice) a sub-part of it.

Follow Me For Updates
Subscribe to my YouTube channel or follow me on Twitter or GitHub to be notified when I post new content.
