In this part of tutorial, we ‘ll see how to made Xamarin Forms – Login Page. You can find in the last post the introduction to Xamarin Forms Tutorial – Prism.
Creating LoginPage
First of all, let’s create a new ContentPage called LoginPage.xaml.
You can see that Visual Studio creates a new file under ViewModels forlder called LoginPageViewModel.cs. Open it, and change the parent class to ViewModelBase.
Change the constructor by injecting the INavigationService dependency. So the code looks like:
using Prism.Commands;
using Prism.Mvvm;
using Prism.Navigation;
using System;
using System.Collections.Generic;
using System.Linq;

namespace Forms.Mobile.ViewModels
{
    public class LoginPageViewModel : ViewModelBase
    {
        public LoginPageViewModel(INavigationService navigationService)
            : base(navigationService)
        {

        }
    }
}
The goal of Xamarin Forms – Login Page is to create a sign in form. So we need to add Email Input field (type of Entry Tag) and Password Input field.
The first step, is to create 2 properties in LoginPageViewModel class called Login and Pwd.
 private string login;
 public string Login
 {
     get => login;
     set => SetProperty(ref login, value);
 }

 private string pwd;
 public string Pwd
 {
     get => pwd;
     set => SetProperty(ref pwd, value);
 }
Now, let’s make some design in LoginPage.xaml:
<?xml version="1.0" encoding="utf-8" ?>
<ContentPage xmlns="http://xamarin.com/schemas/2014/forms"
             xmlns:x="http://schemas.microsoft.com/winfx/2009/xaml"
             xmlns:prism="http://prismlibrary.com"
             prism:ViewModelLocator.AutowireViewModel="True"
             x:Class="Forms.Mobile.Views.LoginPage">
    <StackLayout HorizontalOptions="Center"
                 VerticalOptions="Center">
        <StackLayout Orientation="Horizontal">
            <Label Text="Login:"
                   FontSize="20"
                   WidthRequest="95"
                   HorizontalTextAlignment="End"
                   TextColor="#000"
                   VerticalOptions="Center"/>
            <Entry Placeholder="Email"
                   FontSize="18"
                   WidthRequest="200"
                   VerticalOptions="Center"/>
        </StackLayout>
        <StackLayout Orientation="Horizontal">
            <Label Text="Password:"
                   HorizontalTextAlignment="End"
                   FontSize="20"
                   TextColor="#000"
                   VerticalOptions="Center"/>
            <Entry Placeholder="Password"
                   IsPassword="True"
                   FontSize="18"
                   WidthRequest="200"
                   VerticalOptions="Center"/>
        </StackLayout>
        <StackLayout HorizontalOptions="Center"
                     Margin="0,10">
            <Button Text="Sign in"
                    BackgroundColor="#09C"
                    TextColor="#FFF"
                    WidthRequest="150"/>
        </StackLayout>
    </StackLayout>
</ContentPage>
Before deploying the application, we still have some modifications to make in App.xaml.cs class. Change the first navigation page to LoginPage in OnInitialized method:
protected override async void OnInitialized()
{
     InitializeComponent();
     await NavigationService.NavigateAsync("NavigationPage/LoginPage");
}
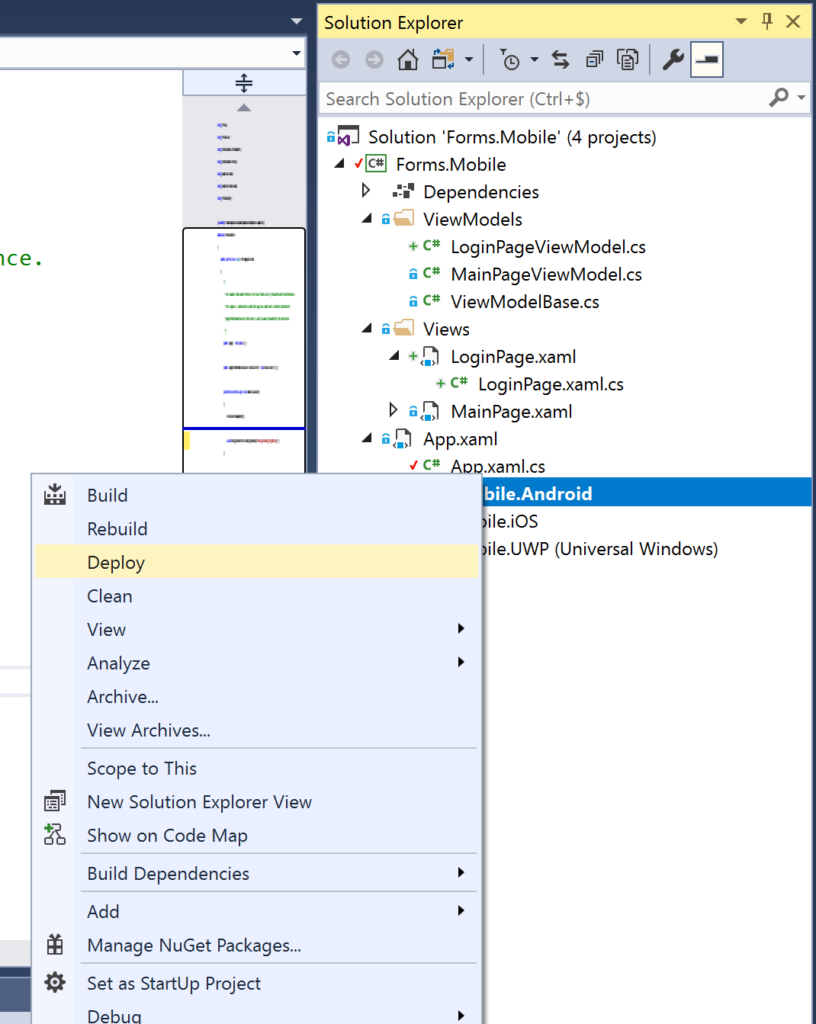
Set the Android project as the startup project and right click on it and chose Deploy.
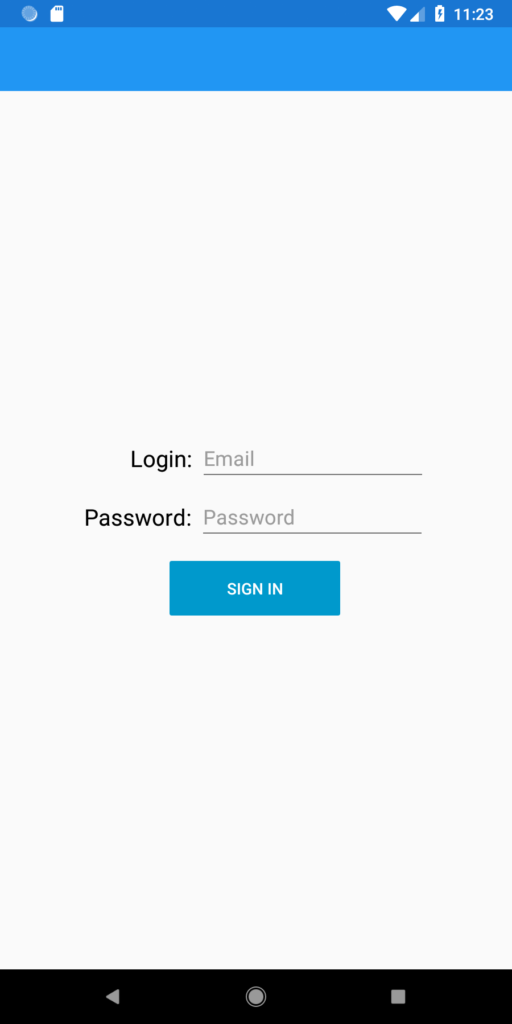
When deploying the application Visual Studio launch by default the installed android simulator.
DataBinding and Commands
Until now, we show only 2 fields and a button, there is non interaction between the view and the view Model. In order to make it functional, we use the DataBinding mechanism. The Mode TowWay allow the modification of property in the in both directions (From View to ViewModel and From ViewModel to View):
<Entry Placeholder="Email"
       FontSize="18"
       Text="{Binding Login, Mode=TwoWay}"
       WidthRequest="200"
       VerticalOptions="Center"/>

<Entry Placeholder="Password"
       FontSize="18"
       Text="{Binding Pwd, Mode=TwoWay}"
       WidthRequest="200"
       VerticalOptions="Center"/>
Finally, we bind the button action by using the Command attribute.
Let’s add a new property in LoginPageViewModel type of DelegateCommand, called SignInCommand. Don’t forget to add the Prism.Commands using.
  public DelegateCommand SignInCommand { get; private set; }

  public LoginPageViewModel(INavigationService navigationService)
         : base(navigationService)
  {
        SignInCommand = new DelegateCommand(SignIp, CanExecuteSignIn);
  }
private bool CanExecuteSignIn()
{
     return false;
}
private void SignIp()
{
   // Call Service for login.
}
<Button Text="Sign in"
        BackgroundColor="#09C"
        TextColor="#FFF"
        Command="{Binding SignInCommand}"
        WidthRequest="150"/>
Inputs validations
User can’t execute sign in request while the Login and password are not valid. Let’s add the business rules to validate the Login and Password.
In LoginPageViewModel, add 2 commands ValidateLoginCommand and ValidatePwdCommand. For each command, we define the Execute and CanExecute method.
So, we add 2 others methods called ValidateLogin and ValidatePwd in which we define the rules, in order to validate the email address and the password string.
 private bool isLoginInValid;
 public bool IsLoginInValid
 {
      get => isLoginInValid;
      set => SetProperty(ref isLoginInValid, value);
 }

 private bool isPwdInValid;
 public bool IsPwdInValid
 {
      get => isPwdInValid;
      set => SetProperty(ref isPwdInValid, value);
 }

public DelegateCommand SignInCommand { get; private set; }
public DelegateCommand ValidateLoginCommand { get; private set; }
public DelegateCommand ValidatePwdCommand { get; private set; }

public LoginPageViewModel(INavigationService navigationService)
        : base(navigationService)
{
    SignInCommand = new DelegateCommand(SignIp, CanExecuteSignIn);
    ValidateLoginCommand = new DelegateCommand(ValidateLogin, () => Login != null);
    ValidatePwdCommand = new DelegateCommand(ValidatePwd, () => Login != null);
}

private void ValidateLogin()
{
       Regex regex = new Regex(@"^([\w\.\-]+)@([\w\-]+)((\.(\w){2,3})+)$");
       Match match = regex.Match(Login);
       IsLoginInValid = !match.Success;
       SignInCommand.RaiseCanExecuteChanged();
}

private void ValidatePwd()
{
      IsPwdInValid = string.IsNullOrEmpty(Pwd);
      SignInCommand.RaiseCanExecuteChanged();
}
Each times, you run the Login or password field, you need to update the sign in can execute ( SignInCommand.RaiseCanExecuteChanged() ), in which we enable or not the click event on SignIn Button.
The IsLoginInValid and IsPwdInValid are used to show or not the error message.
 private bool CanExecuteSignIn()
 {
         if(Login == null || Pwd == null)
         {
             return false;
         }

         if (!IsLoginInValid && !IsPwdInValid)
         {
             return true;
         }
         return false;
   }
In LoginPage.xaml, add the databinding for the 2 fields like this code:
<?xml version="1.0" encoding="utf-8" ?>
<ContentPage xmlns="http://xamarin.com/schemas/2014/forms"
             xmlns:x="http://schemas.microsoft.com/winfx/2009/xaml"
             xmlns:prism="http://prismlibrary.com"
             prism:ViewModelLocator.AutowireViewModel="True"
             x:Class="Forms.Mobile.Views.LoginPage">
    <StackLayout HorizontalOptions="Center"
                 VerticalOptions="Center">
        <StackLayout Orientation="Horizontal">
            <Label Text="Login:"
                   FontSize="20"
                   WidthRequest="95"
                   HorizontalTextAlignment="End"
                   TextColor="#000"
                   VerticalOptions="Center"/>
            <Entry Placeholder="Email"
                   FontSize="18"
                   Text="{Binding Login, Mode=TwoWay}"
                   WidthRequest="200"
                   VerticalOptions="Center">
                <Entry.Behaviors>
                    <prism:EventToCommandBehavior EventName="TextChanged"
                                                  Command="{Binding ValidateLoginCommand}" />
                </Entry.Behaviors>
            </Entry>
        </StackLayout>
        <Label IsVisible="{Binding IsLoginInValid}"
                   TextColor="Red"
                   HorizontalOptions="Center"
                   Text="Email is required field!"
                   FontSize="12"
                   FontAttributes="Italic" />
        <StackLayout Orientation="Horizontal">
            <Label Text="Password:"
                   HorizontalTextAlignment="End"
                   FontSize="20"
                   TextColor="#000"
                   VerticalOptions="Center"/>
            <Entry Placeholder="Password"
                   IsPassword="True"
                   FontSize="18"
                   Text="{Binding Pwd, Mode=TwoWay}"
                   WidthRequest="200"
                   VerticalOptions="Center">
                <Entry.Behaviors>
                    <prism:EventToCommandBehavior EventName="TextChanged"
                                                  Command="{Binding ValidatePwdCommand}" />
                </Entry.Behaviors>
            </Entry>
        </StackLayout>
        <Label IsVisible="{Binding IsPwdInValid}"
                   TextColor="Red"
                   HorizontalOptions="Center"
                   Text="Password is required field!"
                   FontSize="12"
                   FontAttributes="Italic" />
        <StackLayout HorizontalOptions="Center"
                     Margin="0,10">
            <Button Text="Sign in"
                    BackgroundColor="#09C"
                    TextColor="#FFF"
                    Command="{Binding SignInCommand}"
                    WidthRequest="150"/>
        </StackLayout>
    </StackLayout>
</ContentPage>
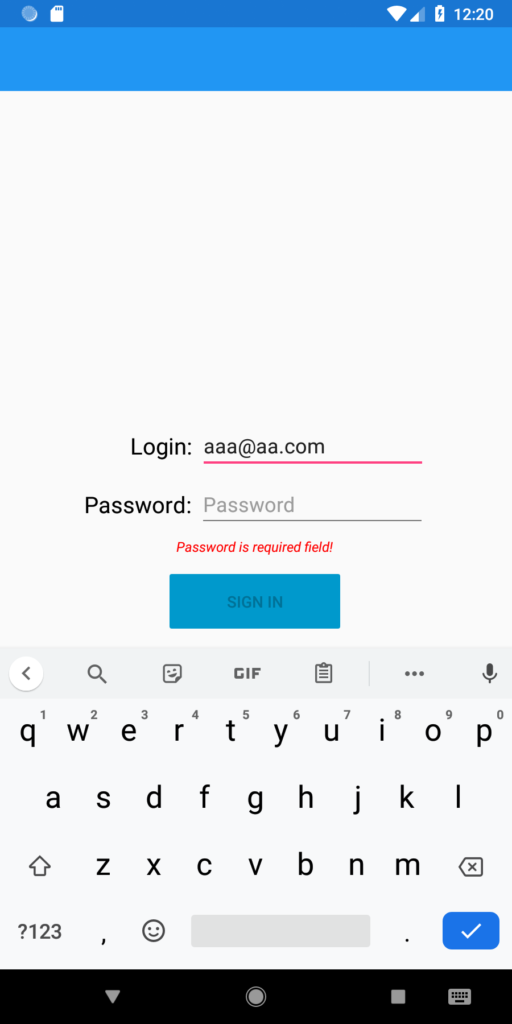
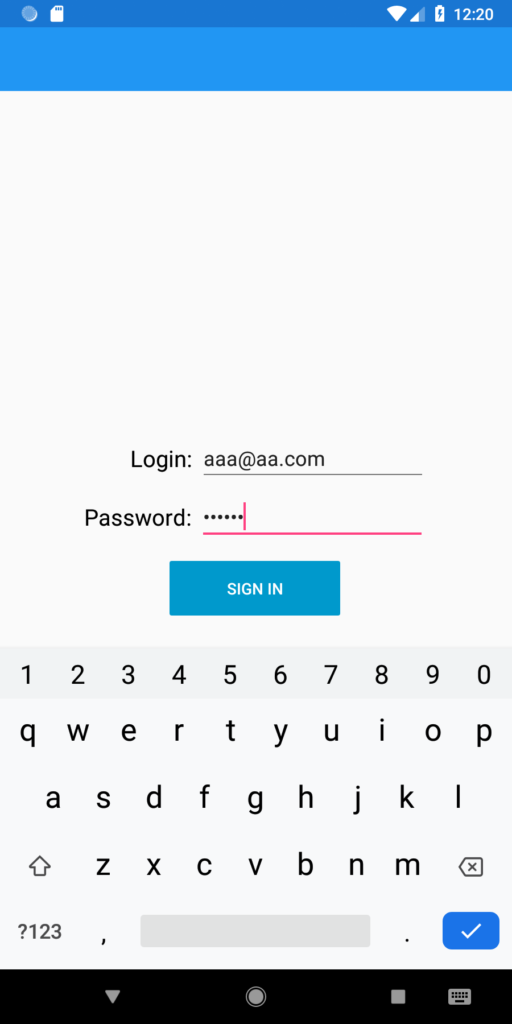
Run the application and you should have something like this:
Define Authentication service
In the last part of this tutorial, we ‘ll make an authentication service, in which we use the HttpClient to call the WebAPI used in Angular 8 Tutorial.
First of all, create new Folder called Services, in which we define a new class called AuthenticationService and an interface called IAuthenticationService.
We need also to add the Models for Login and User under Models Folder.
namespace Forms.Mobile.Models
{
    public class UserModel
    {
        public int Id { get; set; }

        /// <summary>
        /// Gets or sets the FirstName.
        /// </summary>
        public string FristName { get; set; }

        /// <summary>
        /// Gets or sets the LastName.
        /// </summary>
        public string LastName { get; set; }

        /// <summary>
        /// Gets or sets the Email.
        /// </summary>
        public string Email { get; set; }

        /// <summary>
        /// Gets or sets the password.
        /// </summary>
        public string Password { get; set; }

        /// <summary>
        /// Gets or sets the mobile number.
        /// </summary>
        public string mobileNumber { get; set; }
    }
}
namespace Forms.Mobile.Models
{
    public class LoginModel
    {
        public string Email { get; set; }
        public string Password { get; set; }
    }
}
using Forms.Mobile.Models;
using System.Threading.Tasks;

namespace Forms.Mobile.Services
{
    public interface IAuthenticationService
    {
        Task<UserModel> Login(LoginModel loginModel);
    }
}
using System;
using System.Net.Http;
using System.Text;
using System.Threading.Tasks;
using Forms.Mobile.Models;
using Newtonsoft.Json;

namespace Forms.Mobile.Services
{
    public class AuthenticationService : IAuthenticationService
    {
        public async Task<UserModel> Login(LoginModel loginModel)
        {
            using (HttpClient httpClient = new HttpClient())
            {
                try
                {
                    httpClient.BaseAddress = new Uri("http://10.0.2.2:14958/api/");
                    var content = JsonConvert.SerializeObject(loginModel);
                    HttpContent contentPost = new StringContent(content, Encoding.UTF8, "application/json");
                    var response = await httpClient.PostAsync("users/login", contentPost);
                    if (!response.IsSuccessStatusCode)
                    {
                        throw new HttpRequestException();
                    }
                    else
                    {
                        var result = await response.Content.ReadAsStringAsync();
                        return JsonConvert.DeserializeObject<UserModel>(result);
                    }
                }
                catch (Exception exp)
                {
                    // TODO LOG.
                    return null;

                }
            }

        }
    }
}
The android emulator can’t access localhost directly, because this name domain is already user by the emulator. So, we need to change the URL in Forms.WebAPI project properties to 127.0.0.1:
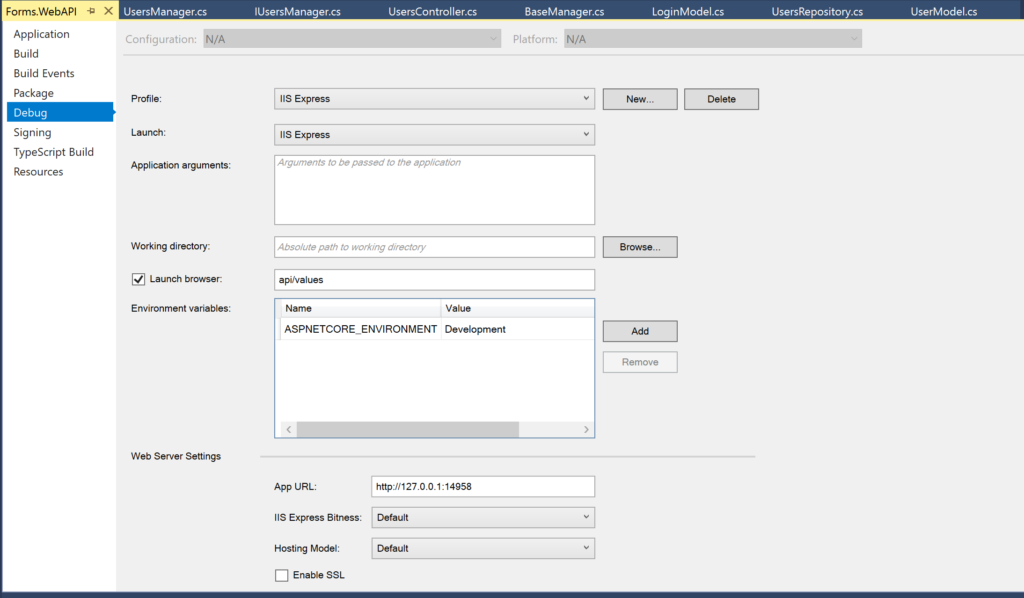
In the emulator settings, Select Manual proxy configuration. Put 10.0.2.2 in host name and you Web API port number. In my case the port number is 14958.
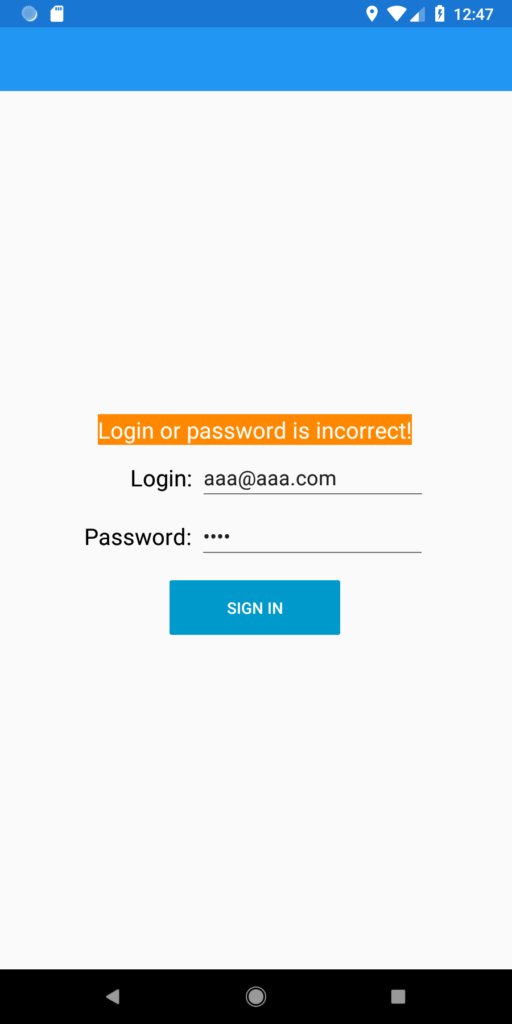
In LoginPageViewModel, call the AuthenticationService to make login. If the user is null, show an error message “Login or password is incorrect!”
private async void SignIp()
{
            // Call Service for login.
    var user = await authenticationService.Login(new LoginModel { Email = Login, Password = Pwd });
    if (user != null)
    {
      await NavigationService.NavigateAsync("MainPage");
    }
    else
    {
       // Show login error;
       IsLoginErrorVisible = true;
    }
}
Finally, In LoginPge.xaml, add message error, in which visibility is bind to IsLoginErrorVisible property.
<Label Text="Login or password is incorrect!"
       HorizontalOptions="Center"
       TextColor="#000"
       FontSize="20"
       IsVisible="{Binding IsLoginErrorVisible}"
       BackgroundColor="Red"/>
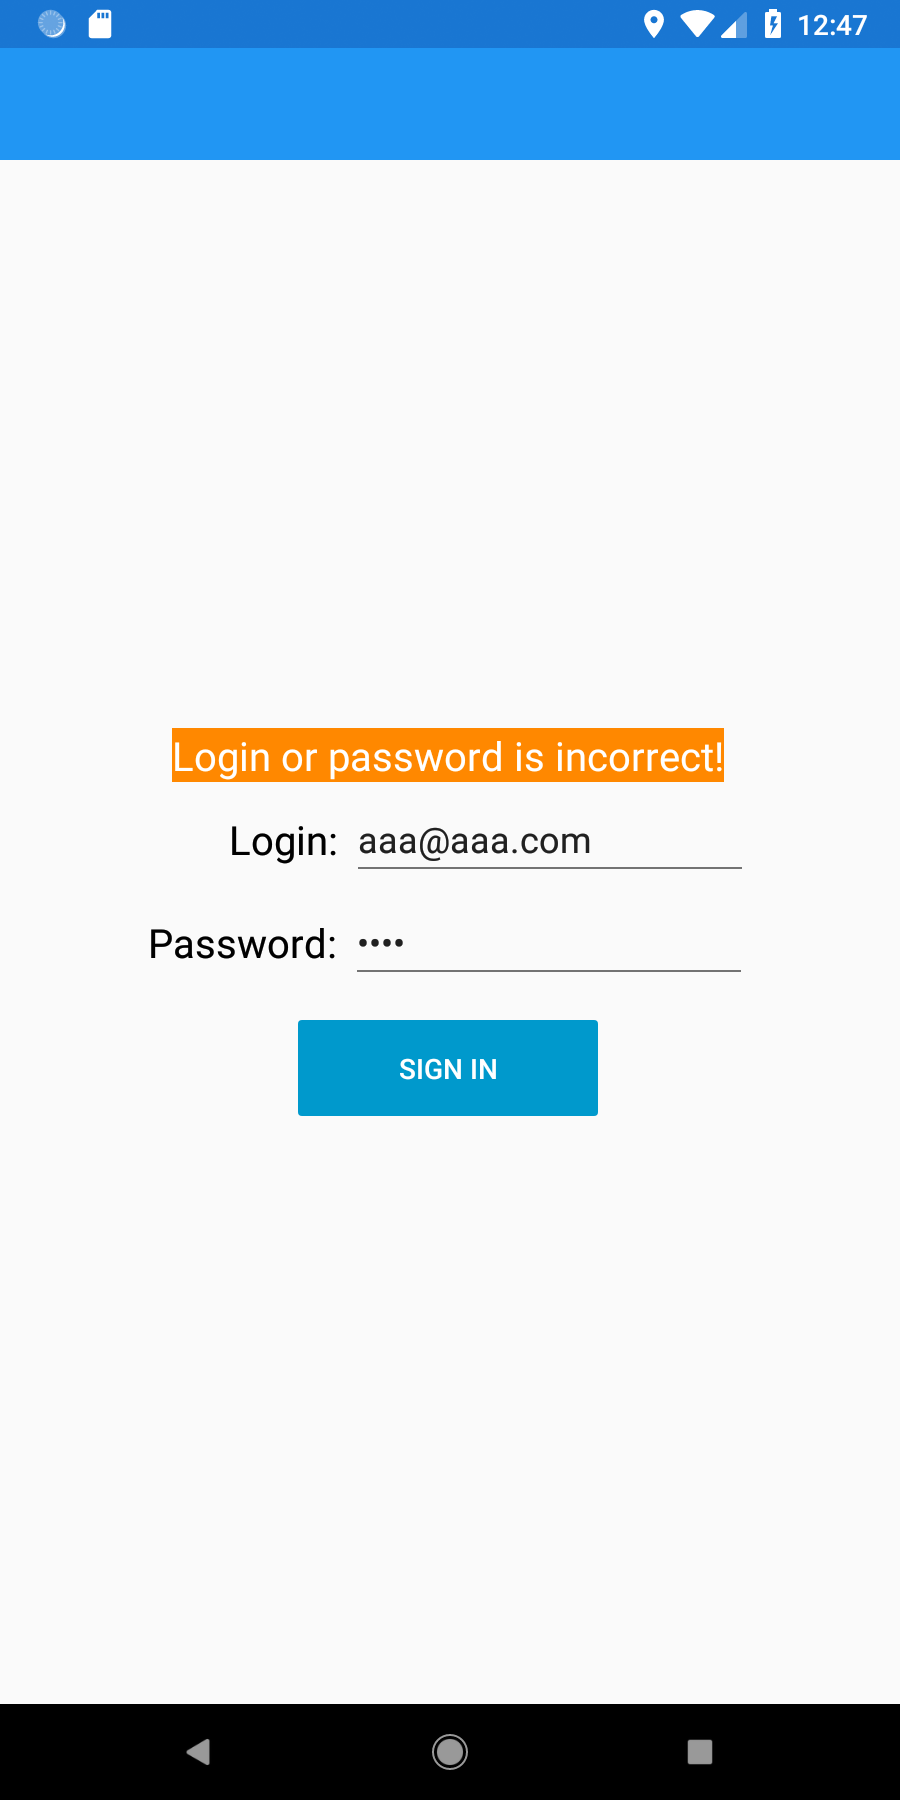
Run the application, and try to put a wrong login and password:
Follow Me For Updates
Subscribe to my YouTube channel or follow me on Twitter or GitHub to be notified when I post new content.
